|
Part 1, Know
the tools
Ok, so you
want to animate a model, eh? Unlike what
most tutorials say, there's a lot more to
animating than pushing the Animate button
and moving things around. There are a lot
of tools and techniques to use to make your
animations move much smoother and more fluently.
So what are the tools you need to know about?
Well, obviously the Animate button will
be the one you'll use the most (for 3DS
Max 5 and up users, the "Auto Key"
button does exactly the same job) and what
this does is automatically set a key at
that frame for the object's position, rotation
and scale. NOTE: If you move objects without
the animate key pressed then it wont animate
and could mess up your animation. The key will appear on the time
frame just under the viewports. The time
frame shows how many frames are in your
animation, and has a slider above it to
slide the viewports to a certain frame of
the animation. The ammount of frames in
your animation is set to 100 frames by default,
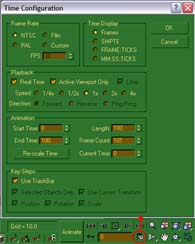
but can be changed in the Time Configuration
window. You can get this window by clicking
the button circled, and with it you can change
the frame rate, number of frames, even the
playback settings for gmax. It's all pretty
self-explanatory and should always be set
before you start your animation. Also shown
here are the VCR buttons, at any time you
can hit play to preview the animation according
to the playback settings, hit play again
to stop.
I
guess that'll do for now. Now all we need
is a model to animate...
Proceed
to Part 2
|


|


